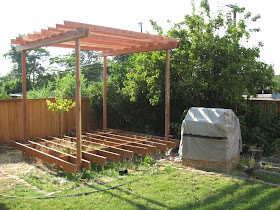
I recently completed construction of our long anticipated pergola in our back yard. Many folks have expressed interest in the project so I thought I would share the how-to part of the process to help inspire everyone.
The process began on a piece of quad paper where a I drew out the design. We had a couple obstacles to overcome:
1. We didn't have a concrete pad poured already.
2. Since we are on bench, our yard slopes at a steady incline
To overcome these problems, we decided to approach the issue with a suspended deck that would could build to float over the sloping yard and then build the cover once that was finished.
So, I went to work constructing the deck structure. I want this structure to last for 50 years so I double checked the spacing requirements for different spans and thicknesses of lumber. I settled on treated 4x6 beams as the bottom support spaced 4 feet apart and treated 2x8 floor joists spaced about 18 inches apart.
The trick though was getting the beams level on post bases sitting in concrete. I wasn't sure when I started how to pour concrete first and then level the beam. So, I reversed the process. I placed the first beam on bricks and shims and leveled it. I also preattached the post bases to the beam so they dangled in the air in the hole I had dug for the concrete. Once everything was level, I mixed and poured the concrete in the holes and let it set around the post base. I repeated the step for the next beam making sure it was level with the first. I used string and a string level to accomplish this.
Next, I installed the deck joists. Keep in mind that I wanted my finished product to be 12x12 so that meant cutting about 3 inches off the end of each 12 foot board to make room for the decorative redwood skirt that would ultimately go around the exterior.
To keep the deck joists from tipping or wobbling, I installed center bracing to act as a support. I used metal brackets to tie the beams to the joists.
After the structure for the deck was finished, I began work on the decorative upper structure of the pergola. The design required four posts to support the structure. However, these posts has to be nearly level in height with one another and they had to sit in concrete. I followed my previous pattern by creating a 'jig' for the post base and suspended it in the air over a hole and then poured concrete around it.
The jig was made to hold the post base in a predetermined fixed position below the joists. Since the joists were level, this resulted in the posts bases being level with one another.
Work then began on the upper structure. The upper structure called for paired 2x8 redwood beams running perpendicular to 2x6 rafters. The posts were 10' tall. I installed the posts in the post bases and also secured them to adjacent deck joists for additional stability.
Since I was building this alone, I had to figure out how to get the beams to the top of the posts. It was just me and a ladder. After some trial and error, I settled on screwing scrap pieces of 2x6 on the top part of the beam where it would attach to the posts. Then I hoisted the beam up and let it hang by the scrap pieces which sat on top of the post. This allowed me to make sure the post and beam were level. I attached a screw to the beam at each post and repeated the step for the rest of the beams. Screws do not hold a shear force well and will break, so I drilled 1/2" holes through both beams and the post and secured them with bolts instead.
Then came the part of installing the rafters. They are spaced 14 inches apart and held in place with screws. They won't be carrying any load other some some light snow so these screws should be all that is needed.
Finally, the redwood 2x12 skirt was installed around the exterior of the deck structure.
We nailed cedar lattice to the interior as a barrier to keep out cats and other animals.
Then we used 2x6 redwood planks for decking.
Finally, a coat of natural redwood stain was applied to the entire structure. We used just over one gallon.
The entire structure cost approximately $1,500 and took me about 5 full days of labor (spread out over several weekends) to complete.


No comments:
Post a Comment
Please keep comments appropriate and respectful for a real estate blog. Personal rants, spam, and off topic comments will be deleted.